Difference between revisions of "AN~GRR-5"
RadioNerds (talk | contribs) |
RadioNerds (talk | contribs) |
||
| (43 intermediate revisions by the same user not shown) | |||
| Line 1: | Line 1: | ||
| − | + | [[File:an_grr-5-5.jpg|400px|right]] | |
| − | |||
| − | |||
==Images== | ==Images== | ||
| − | <gallery widths=100px heights=100px | + | <gallery widths=100px heights=100px> |
File:an_grr-5-1.png | File:an_grr-5-1.png | ||
File:an_grr-5-2.png | File:an_grr-5-2.png | ||
| Line 11: | Line 9: | ||
File:an_grr-5-7.jpg | File:an_grr-5-7.jpg | ||
File:an_grr-5-8.jpg | File:an_grr-5-8.jpg | ||
| + | File:An grr-5 CR102 schematic.jpg | ||
</gallery> | </gallery> | ||
| − | |||
==Power Hookups== | ==Power Hookups== | ||
| Line 32: | Line 30: | ||
==Recommended Modifications== | ==Recommended Modifications== | ||
| − | |||
| + | {{Template:NeedsUpdating}} | ||
===Add a Grounded Power Cable=== | ===Add a Grounded Power Cable=== | ||
| Line 43: | Line 41: | ||
:'''Pin D''' - AC | :'''Pin D''' - AC | ||
| − | == | + | |
| + | ===Replace Defunct Selenium Rectifiers with modern components=== | ||
| + | There are a couple key components that are often defunct that can be replaced with modern equivalents. Rectifiers and Diodes of the time used Selenium. This material easily degrades and is often the cause of a non-working radio. If they are not working they should be replaced with modern components. Modern components are often not a direct replacement. Selenium components often had high resistance, the voltage that the downline components saw was often designed with this in mind. The resistance in modern components is minimal, and it may be necessary to install resistors to simulate the same characteristics as the old ones. | ||
| + | |||
| + | |||
| + | ====Replace the Selenium Bridge Rectifier with a modern equivalent==== | ||
| + | My rectifier was blown, but i generally will look carefully at replacing these any chance i get, even NOS parts are usually no good. Just replace with a modern one. | ||
| + | |||
| + | <gallery widths=400px heights=200px perrow=2> | ||
| + | File:an_grr-5_factory_supply.png|'''Factory Power Supply (Red arrow shows selenium rectifier)''' | ||
| + | File:an_grr-5_CR101_schematic.png|'''Detail of CR101 Selenium Rectifier''' | ||
| + | </gallery> | ||
| + | |||
| + | ====Relocate and replace the In case diodes with modern ones inside the power supply==== | ||
| + | This was originally required because the pins on the power cable connecting the power supply to the receiver were broken, but it also served as a nice way to get rid of the selenium diodes inside the case. I removed the need for the case diodes, by replacing them with modern equivalents inside the power supply itself. | ||
| + | |||
| + | <gallery widths=400px heights=200px perrow=2> | ||
| + | File:an_grr-5_selenium_rectifiers_in_cabinet.jpg|'''Selenium Diodes in Cabinet''' | ||
| + | File:an_grr-5_CR102_schematic.png|'''Detail of CR102 Rectifier in Cabinet''' | ||
| + | </gallery> | ||
| + | |||
| + | ====Modified Power Supply with Both Changes==== | ||
| + | |||
| + | [[File:an_grr-5_modified_power_supply.png|400px|'''Modified Power Supply''']] | ||
| + | |||
| + | |||
| + | |||
| + | ==Interconnection Cable Pinout== | ||
| + | |||
| + | ;J101 | ||
| + | :'''Pin 1''' + 24 V DC | ||
| + | :'''Pin 2''' Diode in Case | ||
| + | :'''Pin 3''' | ||
| + | :'''Pin 4''' Diode in Case | ||
| + | :'''Pin 5''' Ground | ||
| + | :'''Pin 6''' +90 V DC | ||
| + | :'''Pin 7''' +12 V DC | ||
| + | :'''Pin 8''' - 4.2 V DC | ||
| + | :'''Pin 9''' | ||
| + | :'''Pin 10''' Ground | ||
| + | :'''Pin 11''' +1.4 V DC | ||
| + | |||
| + | ==Reference Files== | ||
;{{pdf|TM_11-295.pdf|TM 11-295}} | ;{{pdf|TM_11-295.pdf|TM 11-295}} | ||
:Radio Receiving Set | :Radio Receiving Set | ||
Latest revision as of 13:51, 29 June 2016
Contents
Images
Power Hookups
The AN/GRR-5 Radio has an exceptionally flexible power input specification. This radio can operate on 6, 12, or 24 Volts DC as well as 115 Volts AC. The voltage is determined by a switch on the front of the power supply or automatically in the case of 115 Volts AC.
hookups for each power range is made by different pins on the J103 Power plug. They are as follows:
- 6, 12, 24 Volts DC
- Pin C - Ground
- Pin B - 6, 12, 24 Volts DC
- 115 Volts AC
- Pin D - AC
- Pin A - AC
Recommended Modifications
Add a Grounded Power Cable
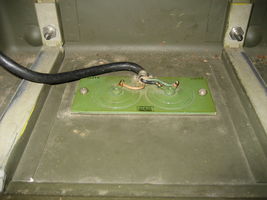
Replace the factory 2 conductor plug and cord with a modern 3 prong grounded plug. To do this, unsolder the factory plug from the power cord and replace it with a modern, 3 plug type. Use the following pinout for hookups:
- 115 Volts AC
- Pin A - AC
- Pin C - Ground
- Pin D - AC
Replace Defunct Selenium Rectifiers with modern components
There are a couple key components that are often defunct that can be replaced with modern equivalents. Rectifiers and Diodes of the time used Selenium. This material easily degrades and is often the cause of a non-working radio. If they are not working they should be replaced with modern components. Modern components are often not a direct replacement. Selenium components often had high resistance, the voltage that the downline components saw was often designed with this in mind. The resistance in modern components is minimal, and it may be necessary to install resistors to simulate the same characteristics as the old ones.
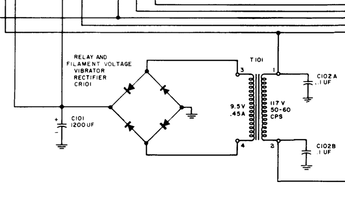
Replace the Selenium Bridge Rectifier with a modern equivalent
My rectifier was blown, but i generally will look carefully at replacing these any chance i get, even NOS parts are usually no good. Just replace with a modern one.
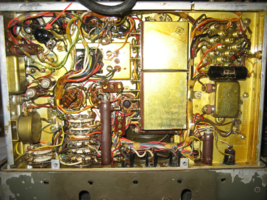
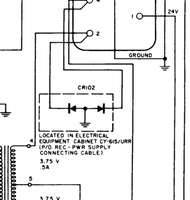
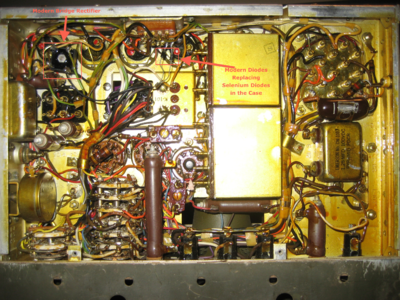
Relocate and replace the In case diodes with modern ones inside the power supply
This was originally required because the pins on the power cable connecting the power supply to the receiver were broken, but it also served as a nice way to get rid of the selenium diodes inside the case. I removed the need for the case diodes, by replacing them with modern equivalents inside the power supply itself.
Modified Power Supply with Both Changes
Interconnection Cable Pinout
- J101
- Pin 1 + 24 V DC
- Pin 2 Diode in Case
- Pin 3
- Pin 4 Diode in Case
- Pin 5 Ground
- Pin 6 +90 V DC
- Pin 7 +12 V DC
- Pin 8 - 4.2 V DC
- Pin 9
- Pin 10 Ground
- Pin 11 +1.4 V DC
Reference Files
- Radio Receiving Set
- AN/GRR-5
- August 1952
