Difference between revisions of "Integrating the VIC-1 with other equipment"
RadioNerds (talk | contribs) (Created page with "Integrating the VIC 1 with other equipment is quite easy really.. there are some common connections that can be used. ;TX / RX :J501 or J503 must be used, they are 18 pin connec...") |
RadioNerds (talk | contribs) |
||
| (73 intermediate revisions by the same user not shown) | |||
| Line 1: | Line 1: | ||
| − | Integrating the VIC 1 with other equipment is quite easy | + | =Integration= |
| + | |||
| + | Integrating the VIC 1 with other equipment is quite easy. There are some common connections that can be used. The biggest worry here will be to isolate the 12 volt radios from the 24 volt VIC-1, you can't simply hook these things together and expect them to not fry one another. | ||
| + | |||
| + | The biggest concern is when you are using a 24 to 12 volt converter in the vehicle and run the FM radio for example on 12 volt and the VIC-1 on 24, this could lead to damaging either one. If its an IPOD that isn't powered by the truck, (no cig plug, for example) then your likely ok.c | ||
| + | |||
| + | |||
| + | ;There are some common things that people want to do... | ||
| + | :#Hook up an FM radio, Satellite receiver, scanner, ipod, or other MP3 player. RX (receive) ONLY | ||
| + | :#Hook up a Transceiver, like a CB, FRS/GMRS radio, Ham Radios etc. This is TX (Transmit) / RX | ||
| + | |||
| + | = Receive Only Inputs = | ||
| + | |||
| + | === Using the "Audio Input or "Tele / Remote" Inputs === | ||
| + | |||
| + | You can make a simple pigtail from an old set of headphones and wire your ipod straight to these jacks. | ||
| + | |||
| + | [[file:AM-1780_audio_inputs.jpg|400px]] | ||
| + | |||
| + | |||
| + | |||
| + | [[File:audio_plug.png]] | ||
| + | |||
| + | |||
| + | ;Audio Input Jacks (left side) | ||
| + | :These are amplified and will give you more input volume | ||
| + | ::Audio Ground (ring) connector to GND | ||
| + | ::Tip to the other | ||
| + | |||
| + | ;Tel/Remote jacks (right side) | ||
| + | :These are 600 ohm input sources for other military gear, these will be too low for use in most cases. You could however use the transformer from an old [[LS-166/U]] speaker to attempt to match it. | ||
| + | |||
| + | === Using the J508 Power Jack === | ||
| + | To integrate something that is RX only, the best thing to do is to use the J508 4 pin power jack. Although this is a power input when the intercom is in Internal (no military radio hooked up) mode, this is NOT used when a MT-1029 is on the system. This is because the VIC1 will get its power from the radio mount on J501 or J503. This plug doubles as an RX input source. | ||
| + | |||
| + | To hook up an input source simply use this hookup | ||
| + | |||
| + | [[File:vic1-4-pin-civilian-rx-cut.png|600px]] | ||
| + | |||
| + | :'''A''' - Audio Ground | ||
| + | :'''B''' - NC | ||
| + | :'''C''' - Fixed Audio | ||
| + | :'''D''' - Variable Audio | ||
| + | |||
| + | |||
| + | |||
| + | '''''NOTES:''''' | ||
| + | - Need to verify the impedance of T-1 to insure proper matching, this is really here for unity and to maintain isolation | ||
| + | |||
| + | |||
| + | To use the circuit above you simply need to provide audio to the audio inputs from a line-out source on the radio. Line out is desired because it is usually quite low, and a fixed level, you want the Vic1 to do the amplification. You could use a speaker out, but you need to be ''very'' careful not to give it too much volume, the VIC1 wont react well, it will clip (sound distorted) and overdrive the amp. I do use the same circuit above to plug in my ipod and it works perfectly as long as the volume is reasonable. You wont smoke it as along as your not attempting to slam 300 watts from an amp into it. | ||
| + | |||
| + | ====How Can I use the Power Plug for Audio, if im using it for Power?==== | ||
| + | Well thats a good point. The Vic-1 has the ability to get its power from the MT-1029 mount usually seen with the RT-524 or GRC-160 radios.. Even if you aren't putting in a radio you can still use this configuration to free up the power port. You are essentially using the power block from the back of the MT-1029 mount as a power point. The great thing is that it also gives you the ability to plug in more 24 volt accessories to the other power ports on the block. | ||
| + | |||
| + | Do the following: | ||
| + | *1) Remove the power block from an MT-1029 mount.. to do this remove the phillips head screws from around the block. unscrew the collars on the connectors. the block should come off. | ||
| + | *2) Remove the Power cable from the VIC-1 (J508) and plug into the power block | ||
| + | *3) Connected the VIC-1 radio "A" (J501) cable to the block | ||
| + | *4) Move the "Installation Switch" on the VIC-1 to "OTHER" | ||
| + | |||
| + | You will now power the VIC-1 via the Radio "A" (J501) cable instead of the power plug (J508) | ||
| + | |||
| + | = Transmit and Receive inputs = | ||
| + | |||
| + | This is a much harder situation, as i stated before you cant simply start splicing things together to get this going, you will certainly smoke a radio. You need to isolate the audio in and out and the PTT key circuits from each other. fortunately there is a fairly straightforward method to do this. | ||
| + | |||
| + | [[File:rib1-basic.png|600px]] | ||
| + | |||
| + | |||
| + | SEE [[AM-1780~VRC|AM-1780/VRC]] for Jack details | ||
;TX / RX | ;TX / RX | ||
| − | :J501 or J503 must be used, they | + | :J501 or J503 must be used, they use the [[CX-4723~VRC|CX-4723/VRC]], 18 Pin Cable. |
| − | |||
| − | [[CX-4723| CX-4723 | ||
| Line 11: | Line 79: | ||
| + | |||
| + | ==Images== | ||
| + | <gallery widths=100px heights=100px perrow=5> | ||
| + | File:vic1-tx-rx-to-civilian_radio.gif|Proper Isolated Interface for 12volt radios to Intercom with TX and RX | ||
| + | File:vic1-18-pin-civilian-tx-rx.jpg|Civilian Radio Connections to A (J501) or C (J503) | ||
| + | File:vic1-4-pin-civilian-rx.gif|Civilian Radio Connection to C-RX (J508) | ||
| + | File:vic1-nokia_style-cellphone.gif|Nokia Style headset Connection to A (J501) or C (J503) | ||
| + | File:vic1-kenwood-ht.gif|Kenwood HT Connections to A (J501) or C (J503) | ||
| + | </gallery> | ||
| + | |||
| + | |||
| + | |||
| + | ==Example of My integration== | ||
| + | These are some photos of my integration of the VIC1 with civilian radios, i used the circuit defined in the page | ||
| + | |||
| + | <gallery widths=100px heights=100px perrow=5> | ||
| + | File:Vic1-tx-rx-to-civilian radio.gif|This is the base schematic used in the design | ||
| + | File:IMG 0280.JPG|ProtoType circuit and additional wiring. | ||
| + | File:Vic1-18-pin-civilian-tx-rx.jpg|This is another schematic used in the design | ||
| + | File:IMG 0282.JPG|110 Watt VHF with the pigtail | ||
| + | File:IMG 0281.JPG|EF Johnson, business band radio, programmed with the GMRS/FRS frequency set. | ||
| + | </gallery> | ||
| + | |||
| + | = Updated Circuit Boards / Designs = | ||
| + | |||
| + | I have created a Circuit board that will make this much cleaner and neater. This board is designed to be used alone with a single radio, or grouped together by means of a link board. the point here is that you can have up to 4 radios in one system, and be able to choose which radio will be keyed when you activate the PTT on the VIC1. In a certain configuration, you can key ALL THE RADIOS at once! now thats fun! | ||
| + | |||
| + | ==How it Works== | ||
| + | these are designed to allow you to use only one board or multiples into one intercom system. For example, you could use a single RIB to hook up a single cb and run that for awhile, then decide to add some other radio like GMRS or ham. all you need to do is to make an additional rib, add the link board and it's all ready. if something goes wrong with any rib or link board, you can always swap them out to any radio and it will work again. Also the design allows the radio to continue working via the regular mic, because I integrated the pigtail into the radion, and not the mic jack. If the whole thing blows up, the radio is still the same functional one you had when you started. | ||
| + | |||
| + | ; Examples | ||
| + | (better graphics later) | ||
| + | |||
| + | Single radio | ||
| + | |||
| + | Radio ---> RIB ---> AM-1780 | ||
| + | |||
| + | |||
| + | ;Multiple radios | ||
| + | |||
| + | Radio ---> L | ||
| + | |||
| + | Radio ---> I ---> AM-1780 | ||
| + | |||
| + | Radio ---> N | ||
| + | |||
| + | Radio ---> K | ||
| + | |||
| + | == RIB Layout == | ||
| + | Here is an early layout of the board. | ||
| + | |||
| + | [[File: v1A-rib-layout.png|600px]] | ||
| + | |||
| + | this board is about 2in wide by 3 inches long.. | ||
| + | |||
| + | |||
| + | [[File:radio_board.JPG|600px]] | ||
| + | |||
| + | ;'''A few Design Details''' | ||
| + | *'''12v Sense''' - This allows the Remote PTT selector to indicate if the radio is plugged into the link board port, not needed if its used in a single radio configuration | ||
| + | *'''PTT Cutoff / Enable''' - this allows you to disable PTT for this radio completely, this is good if you want an RX only radio, with no chance to transmit on it. | ||
| + | *'''PTT indicator''' - this will light up when the radio is keyed | ||
| + | *'''Receive resistor bypass''' - in some cases the resistor is needed to prevent overloading the input, like when you use a speaker out from the radio, use this jumper if your using a lower volume output from the radio | ||
| + | *'''Blue pots''' - control the receive the transmit audio levels. | ||
| + | |||
| + | == Link Board == | ||
| + | |||
| + | |||
| + | [[File:Link_board_schematic.png|600px]] | ||
| + | |||
| + | |||
| + | [[File:Link_board.JPG|600px]] | ||
| + | The link board allows you to run up to 4 radios into one vic. This one pictured does not have the PTT control port connector yet, that will allow you to select by a remote selector which radio will be keyed when you PTT from the vic. If you decide not to use the remote, you have to select the PTT radio manually by the small DIP switch. This would be done in advance. I know not very practical on the road, but thats why it has a remote selector. As an added bonus, you can actually allow it to key more than one radio at a time, by turning the PTT for multiple radios on. think of it! key all 4 radios at once!! sweet! (why you would want to is anyones guess, but hey, its still cool!) | ||
| − | + | [[File:Link_board-radio_board.JPG|600px]] | |
| − | |||
| + | The link board allows a separate switchbox to be used to select which radio that is keyed when the VIC-1 headset is keyed. Below is an example of a box created out of a standard frequency switch used with the RT-246. | ||
| − | |||
| − | |||
| − | + | [[File:DSCN0066.JPG|400px]] | |
| − | : | + | Factory Switch Box |
| + | [[File:DSCN0065.JPG|400px]] | ||
| + | Modified Switch Box | ||
| − | ; | + | ==Related Files== |
| − | : | + | ;{{pdf|TM_11-5830-340-12..pdf|TM 11-5830-340-12}} |
| + | :OPERATOR'S AND ORGANIZATIONAL MAINTENANCE MANUAL | ||
| + | ::INTERCOMMUNICATION SET AN/VIC-1(V) (NSN 5830-00-856-3273) | ||
| + | :CONTROL, INTERCOMMUNICATION SETS | ||
| + | ::C-10456/VRC (NSN 5830-01-082-0804) | ||
| + | ::C-10680/VRC | ||
| + | :AMPLIFIER, AUDIO FREQUENCY | ||
| + | ::AM-7046/VRC | ||
| + | ::15 January 1986 | ||
| − | |||
| − | |||
| − | ; | + | ;{{pdf|TM_11-5830-340-30.pdf|TM 11-5830-340-30}} |
| − | : | + | :Direct Support Maintenance |
| + | ::INTERCOMMUNICATION SET AN/VIC-1(V) (NSN 5830-00-856-3273) | ||
| + | ::15 September 1986 | ||
| − | |||
| − | |||
| − | |||
| − | |||
| − | |||
| − | |||
| − | |||
| − | |||
| − | + | [[Category:Military/Integration Projects]] | |
| − | + | [[Category:EF Johnson]] | |
Latest revision as of 02:46, 8 June 2015
Contents
Integration
Integrating the VIC 1 with other equipment is quite easy. There are some common connections that can be used. The biggest worry here will be to isolate the 12 volt radios from the 24 volt VIC-1, you can't simply hook these things together and expect them to not fry one another.
The biggest concern is when you are using a 24 to 12 volt converter in the vehicle and run the FM radio for example on 12 volt and the VIC-1 on 24, this could lead to damaging either one. If its an IPOD that isn't powered by the truck, (no cig plug, for example) then your likely ok.c
- There are some common things that people want to do...
-
- Hook up an FM radio, Satellite receiver, scanner, ipod, or other MP3 player. RX (receive) ONLY
- Hook up a Transceiver, like a CB, FRS/GMRS radio, Ham Radios etc. This is TX (Transmit) / RX
Receive Only Inputs
Using the "Audio Input or "Tele / Remote" Inputs
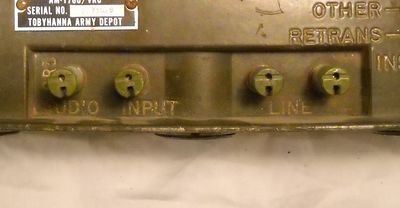
You can make a simple pigtail from an old set of headphones and wire your ipod straight to these jacks.
- Audio Input Jacks (left side)
- These are amplified and will give you more input volume
- Audio Ground (ring) connector to GND
- Tip to the other
- Tel/Remote jacks (right side)
- These are 600 ohm input sources for other military gear, these will be too low for use in most cases. You could however use the transformer from an old LS-166/U speaker to attempt to match it.
Using the J508 Power Jack
To integrate something that is RX only, the best thing to do is to use the J508 4 pin power jack. Although this is a power input when the intercom is in Internal (no military radio hooked up) mode, this is NOT used when a MT-1029 is on the system. This is because the VIC1 will get its power from the radio mount on J501 or J503. This plug doubles as an RX input source.
To hook up an input source simply use this hookup
- A - Audio Ground
- B - NC
- C - Fixed Audio
- D - Variable Audio
NOTES: - Need to verify the impedance of T-1 to insure proper matching, this is really here for unity and to maintain isolation
To use the circuit above you simply need to provide audio to the audio inputs from a line-out source on the radio. Line out is desired because it is usually quite low, and a fixed level, you want the Vic1 to do the amplification. You could use a speaker out, but you need to be very careful not to give it too much volume, the VIC1 wont react well, it will clip (sound distorted) and overdrive the amp. I do use the same circuit above to plug in my ipod and it works perfectly as long as the volume is reasonable. You wont smoke it as along as your not attempting to slam 300 watts from an amp into it.
How Can I use the Power Plug for Audio, if im using it for Power?
Well thats a good point. The Vic-1 has the ability to get its power from the MT-1029 mount usually seen with the RT-524 or GRC-160 radios.. Even if you aren't putting in a radio you can still use this configuration to free up the power port. You are essentially using the power block from the back of the MT-1029 mount as a power point. The great thing is that it also gives you the ability to plug in more 24 volt accessories to the other power ports on the block.
Do the following:
- 1) Remove the power block from an MT-1029 mount.. to do this remove the phillips head screws from around the block. unscrew the collars on the connectors. the block should come off.
- 2) Remove the Power cable from the VIC-1 (J508) and plug into the power block
- 3) Connected the VIC-1 radio "A" (J501) cable to the block
- 4) Move the "Installation Switch" on the VIC-1 to "OTHER"
You will now power the VIC-1 via the Radio "A" (J501) cable instead of the power plug (J508)
Transmit and Receive inputs
This is a much harder situation, as i stated before you cant simply start splicing things together to get this going, you will certainly smoke a radio. You need to isolate the audio in and out and the PTT key circuits from each other. fortunately there is a fairly straightforward method to do this.
SEE AM-1780/VRC for Jack details
- TX / RX
- J501 or J503 must be used, they use the CX-4723/VRC, 18 Pin Cable.
- RX only
- J508 or J510
Images
Example of My integration
These are some photos of my integration of the VIC1 with civilian radios, i used the circuit defined in the page
Updated Circuit Boards / Designs
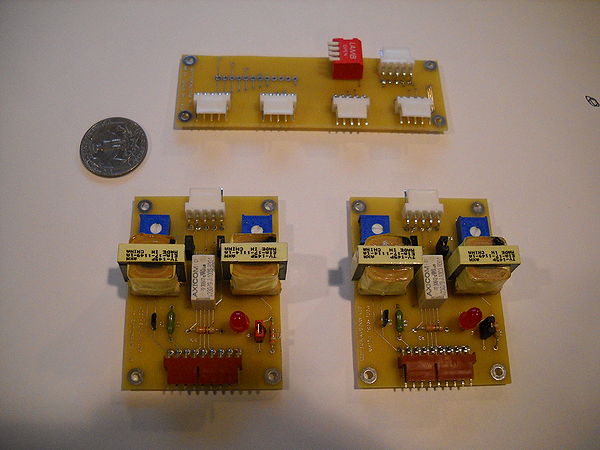
I have created a Circuit board that will make this much cleaner and neater. This board is designed to be used alone with a single radio, or grouped together by means of a link board. the point here is that you can have up to 4 radios in one system, and be able to choose which radio will be keyed when you activate the PTT on the VIC1. In a certain configuration, you can key ALL THE RADIOS at once! now thats fun!
How it Works
these are designed to allow you to use only one board or multiples into one intercom system. For example, you could use a single RIB to hook up a single cb and run that for awhile, then decide to add some other radio like GMRS or ham. all you need to do is to make an additional rib, add the link board and it's all ready. if something goes wrong with any rib or link board, you can always swap them out to any radio and it will work again. Also the design allows the radio to continue working via the regular mic, because I integrated the pigtail into the radion, and not the mic jack. If the whole thing blows up, the radio is still the same functional one you had when you started.
- Examples
(better graphics later)
Single radio
Radio ---> RIB ---> AM-1780
- Multiple radios
Radio ---> L
Radio ---> I ---> AM-1780
Radio ---> N
Radio ---> K
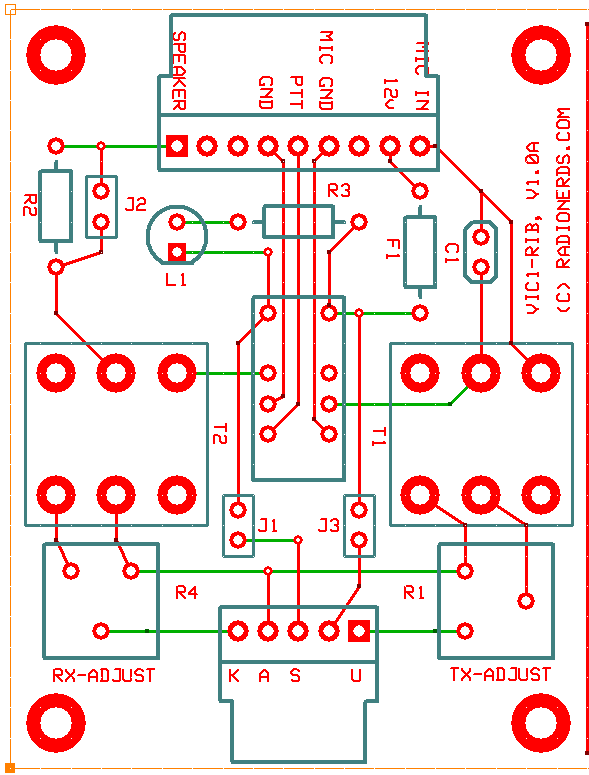
RIB Layout
Here is an early layout of the board.
this board is about 2in wide by 3 inches long..
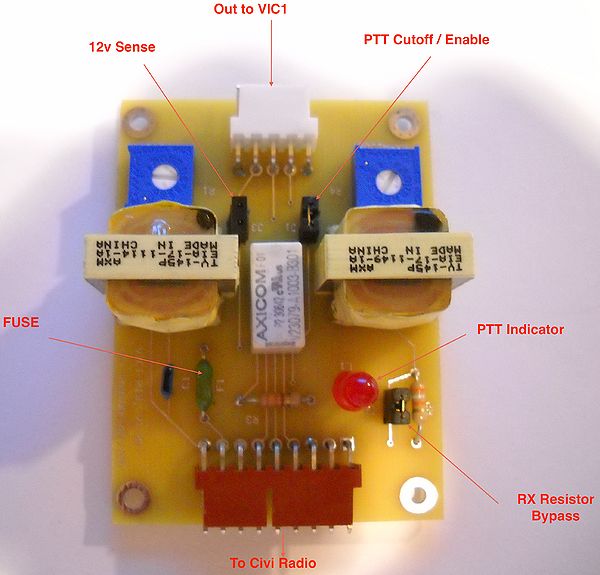
- A few Design Details
- 12v Sense - This allows the Remote PTT selector to indicate if the radio is plugged into the link board port, not needed if its used in a single radio configuration
- PTT Cutoff / Enable - this allows you to disable PTT for this radio completely, this is good if you want an RX only radio, with no chance to transmit on it.
- PTT indicator - this will light up when the radio is keyed
- Receive resistor bypass - in some cases the resistor is needed to prevent overloading the input, like when you use a speaker out from the radio, use this jumper if your using a lower volume output from the radio
- Blue pots - control the receive the transmit audio levels.
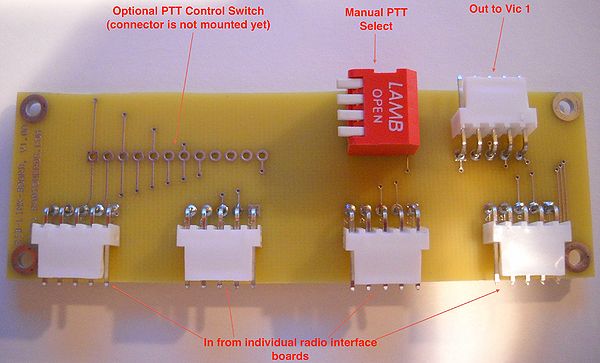
Link Board
The link board allows you to run up to 4 radios into one vic. This one pictured does not have the PTT control port connector yet, that will allow you to select by a remote selector which radio will be keyed when you PTT from the vic. If you decide not to use the remote, you have to select the PTT radio manually by the small DIP switch. This would be done in advance. I know not very practical on the road, but thats why it has a remote selector. As an added bonus, you can actually allow it to key more than one radio at a time, by turning the PTT for multiple radios on. think of it! key all 4 radios at once!! sweet! (why you would want to is anyones guess, but hey, its still cool!)
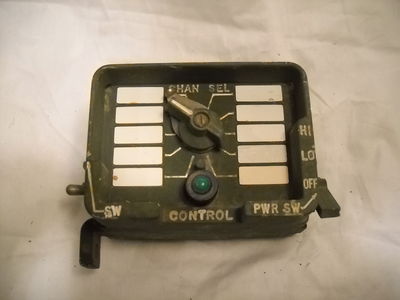
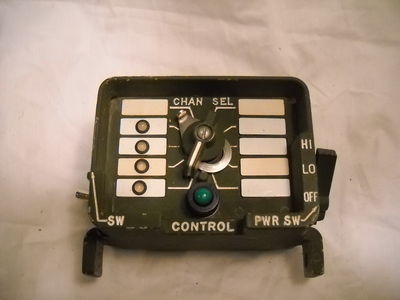
The link board allows a separate switchbox to be used to select which radio that is keyed when the VIC-1 headset is keyed. Below is an example of a box created out of a standard frequency switch used with the RT-246.
Related Files
- OPERATOR'S AND ORGANIZATIONAL MAINTENANCE MANUAL
- INTERCOMMUNICATION SET AN/VIC-1(V) (NSN 5830-00-856-3273)
- CONTROL, INTERCOMMUNICATION SETS
- C-10456/VRC (NSN 5830-01-082-0804)
- C-10680/VRC
- AMPLIFIER, AUDIO FREQUENCY
- AM-7046/VRC
- 15 January 1986
- Direct Support Maintenance
- INTERCOMMUNICATION SET AN/VIC-1(V) (NSN 5830-00-856-3273)
- 15 September 1986
